
Navigating Employee Self-Service Kiosk
You navigate around Employee Self-Service Kiosk using the Main Menu on the left and the sub-menus within the menu items.

Navigation example
In this example it shows an Approved Leave record:
To get to this you select:
- Leave Details from the menu
- The sub-menu Leave Request
- The Approved Leave option on the window displayed
Buttons
| Button | Explanation |
|---|---|
|
Edit

|
This button is available in some of the windows in Employee Self-Service Kiosk. For example, you may want to edit a submitted, but not yet approved, leave request. This button is not available for records like Payslips or YTD (Year to Date) reports. |
|
Arrowheads |
In some windows, such as Leave Balances, there will be multiple sections within the window. |
Permissions
The menus and sub-menus available will vary depending on the permissions you have as part of your login.
Because of this, it is possible that there are items shown in images or described in Help or the Employee Self-Service Kiosk manual, which you don’t see when you log in to Employee Self-Service Kiosk.
Sorting
In all of the sub-node windows with a list displayed in the right hand pane, you may sort the entries:
- Click on the heading of the column that you wish to sort by – this will sort all the entries in ascending order of the selected column. An arrowhead is also displayed in the column heading.

- Click the heading again to sort in descending order.
Column Header Grouping
Some options within Employee Self-Service Kiosk, particularly My Team Views and Management Views provide extensive amounts of data across several fields (column headings), and this data can be grouped by one or more of the fields.
For example, if you are a Manager viewing staff timesheets or expenses, you might want to group the data by Employee Name.
Or you might be an employee with more than one Superannuation Fund – you can run the My Superannuation Report and group the data by Fund Name.
Where a Group Panel area is available, click and drag the appropriate column heading to that area, to group the data.
This is an example of a Management report, before and after grouping by Print Name:
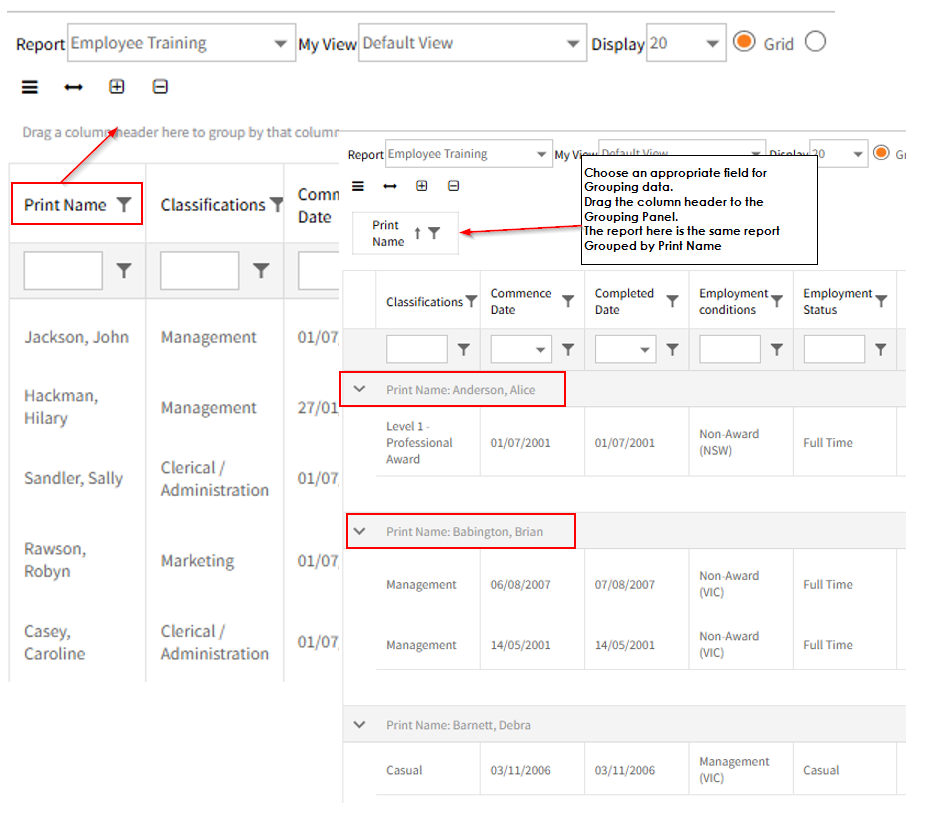
To remove the grouping, drag the same header back to the column headings area, and drop it in the preferred location.
Moving and Resizing Columns
The column widths can be changed by clicking on the dividing line between the headers and dragging to the left or right.
In addition, you can move the columns around by clicking on a column header and dragging to the required location:

Customise Table Layout
On all applicable tables there is a toolbar and menu which allow you to customise the layout of the current table. For example:

| Field | Explanation |
|---|---|
| Customize fields |
Select this option to display a Column Chooser window. This allows you to add or remove fields from the table. To Add: Click on the fields that you wish to add to the table and, holding the left mouse button down, drag it up to the position that you require it in the headers. Repeat this for all the fields you wish to add.
To Remove: You can remove any unwanted columns by clicking on the field in the headers and dragging it back into the Column Chooser.
Close the Column Chooser window to exit this function. |
| Save Current Layout |
If you have customized the table, for example by removing and adding column headings, or resizing and moving columns, click this button to save this layout. Every time you view this particular table, this is the layout that will be used, even if you log out of Employee Self-Service Kiosk. |
| Default Layout | If you no longer require the customized layout, click this button to display the default layout on this table. |
| Fit to Screen |
Clicking this button will display each column on the table, at an equal size. This is useful as a quick fix if the columns are being displayed at various widths. |
| Show/Hide Group Panel | This is the Group Panel, which you can choose to display or hide, as required: The Group Panel appears above a table of data (and is described earlier on this page). |
| Show/Hide Footer Panel |
If you select to show the footer panel, this is displayed at the bottom of a table of data, or below each group (if applied) within a report. It provides summary data for relevant columns. This might include a count of employees, a total of annual salary or standard hours, or an average of years of service. |


When you have finished viewing or editing a screen, ensure you use the navigation options within Employee Self-Service Kiosk (such as the Back button, or a different menu option) not the web browser Back button.
This will help to prevent errors in the way Employee Self-Service Kiosk processes data.
Common Tasks (e.g. Annual Leave, Leave Requests, Payslips)
Typical Layout for Sub-Node windows (specifically in whs in Employee Self-Service Kiosk)